There's something truly special about a beautifully tied bow, isn't there? It adds a touch of charm, a little bit of extra thoughtfulness, to almost anything it graces. Whether you're wrapping up a thoughtful present, giving your hair a pretty lift, or adding a bit of festive cheer to your home, a well-made ribbon bow just makes things feel more complete.
For a long time, many of us might have just admired those picture-perfect loops, perhaps on a holiday package or a lovely floral arrangement, and thought they were just too hard to make ourselves. It turns out, that's really not the case at all. The truth is, figuring out how to put together truly lovely, but not difficult, bows from all sorts of ribbon is actually much simpler than you might think.
You can, you know, create these charming little fabric decorations with just a few basic items you probably already have lying around. We're talking about making something that looks quite polished, yet it won't ask for any special tools or complicated techniques. This means anyone can give it a try and find themselves making something delightful in very little time, so it's almost a fun little craft project for a quiet afternoon.
Table of Contents
- How to Begin Your Ribbon Bow Adventure?
- Getting Your Ribbon Bow Materials Ready
- What Are Some Basic Ribbon Bow Shapes You Can Make?
- Making a Simple Ribbon Bow Step-by-Step
- Working with Wired Ribbon Bows
- Where Can Your New Ribbon Bow Skills Take You?
- Choosing the Right Ribbon for Your Ribbon Bow
- Caring for and Keeping Your Ribbon Bows Nice
How to Begin Your Ribbon Bow Adventure?
So, you're ready to start making your own pretty ribbon creations? That's great! The wonderful thing about this particular craft is how little you need to get going. You don't, for example, need a huge collection of fancy gadgets or a dedicated crafting space. Basically, if you have a bit of ribbon and a pair of scissors, you're pretty much set to go. It's that simple, actually.
Our goal here is to show you how to tie a good-looking ribbon bow, whether it's for a gift, a wreath, or even a tree topper. We'll walk you through a few easy ways to make them, covering different styles and purposes. This means you can pick the method that feels most comfortable for you, or the one that best suits what you're trying to decorate. You know, it's about making it easy and fun.
For instance, some bows are just perfect for adding a bit of flair to a wrapped present, while others might be better suited for something like a hair accessory. We'll cover ways to make a really big bow for your Christmas tree, too. It's all about giving you the know-how to make these charming little additions for various things around your home or for those special occasions. There's a method for just about every need, as a matter of fact.
Getting Your Ribbon Bow Materials Ready
Before you get started on your first ribbon bow, it's a good idea to gather up what you'll need. The list is usually very short, which is part of what makes this so appealing. For a basic bow, you really just need a piece of ribbon and a pair of scissors. That's it for the absolute simplest version, you see. Sometimes, for a bit more structure or a different kind of bow, you might add a few other bits and pieces.
If you're planning on making a bow with wired ribbon, which tends to hold its shape really well, you might also want to have a hot glue gun nearby. This helps to keep things secure and gives your bow a more finished look. Some people also like to use chenille stems, those fuzzy craft wires, to help hold the loops together, which is pretty clever. You know, it just depends on the kind of ribbon bow you're aiming for, but the basic supplies are always very accessible.
You might also want a ruler, especially when you're just starting out, to help you cut your ribbon to a consistent length. For example, a piece of ribbon between 15 and 20 inches long is a pretty good starting point for a lot of common bows. This helps ensure your loops are more or less the same size, which makes for a more balanced-looking ribbon bow. It's not strictly necessary, but it can be helpful, just a little bit, to get things even.
What Are Some Basic Ribbon Bow Shapes You Can Make?
When you think about ribbon bows, you might picture just one kind, but there are actually several easy styles you can learn. Each one has its own particular charm and works well for different things. For instance, there's the classic "bunny ears" bow, which is probably one of the first knots many of us learned. It's a very straightforward way to make a ribbon bow, and it looks quite sweet on presents.
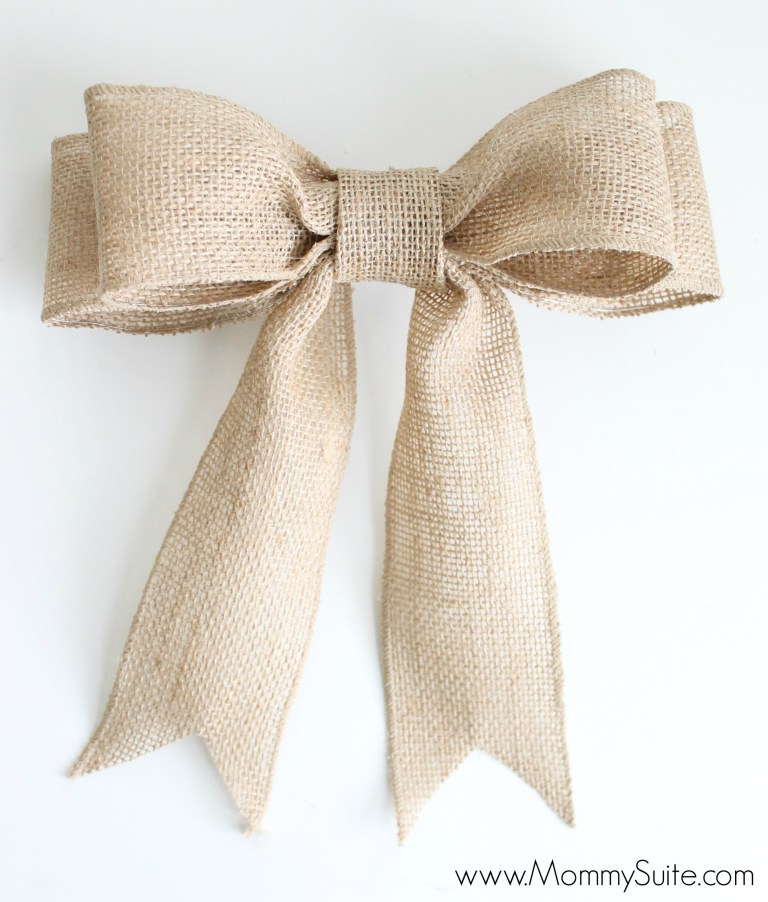
Then there's the more full, "pom-pom" style bow, which gives a really lush, rounded look. This kind of ribbon bow is often used for wreaths or to make a statement on a large gift. It tends to use more ribbon, but the effect is really impressive. You can also learn how to make a "flat" bow, which lies, you know, a bit flatter against a surface, making it good for things like scrapbook layouts or cards where you don't want too much bulk.
And, of course, there are specific methods for working with wired ribbon, which gives you a lot of control over the shape and fluffiness of your ribbon bow. This type of bow can be molded and shaped, which is really handy for things like tree toppers or hair clips where you want the loops to stand up just so. So, there are quite a few variations to explore, each offering a different look for your projects, basically.
Making a Simple Ribbon Bow Step-by-Step
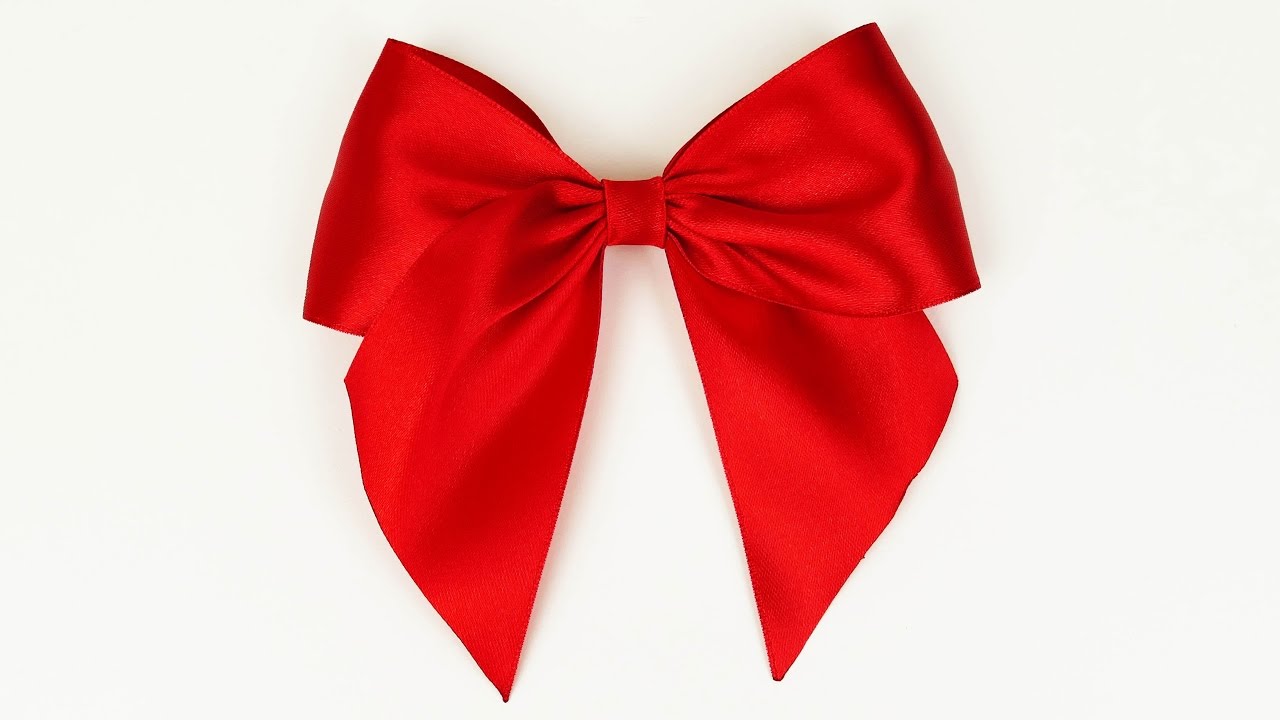
Let's talk about how to make a basic ribbon bow, the kind you might tie on a gift. It's a very simple process, often just four easy motions, or perhaps a few more if you want to get very precise. First things first, you'll want to cut a piece of ribbon to your desired length and lay it out flat on a surface. This gives you a nice, clean starting point for your work, you know.
Next, you'll make a loop on both ends of the ribbon. Think of these as your "bunny ears" if that helps visualize it. The size of these loops will pretty much determine how big your finished ribbon bow will be, so keep that in mind. Try to make them about the same size so your bow looks balanced. It's a little bit like getting ready to tie your shoelaces, actually.
Then, you'll overlap these two loops, just like you do when you're tying a regular knot. You'll bring one loop over the other and then through the opening, pulling it snug. This forms the center of your ribbon bow. After that, you can gently pull and adjust the loops to make them look nice and even. You can, for instance, fluff them out a bit to give the bow more volume. It's really that straightforward to create a lovely ribbon bow.
Working with Wired Ribbon Bows
Wired ribbon is a bit of a different animal when it comes to making bows, but in a good way. The tiny wire along the edges means the ribbon holds its shape really well, which is perfect for creating bows that need to stand up or be a particular shape, like for a wreath or a Christmas tree. If you've ever wondered how to tie a bow with wired ribbon, it isn't as hard as you might think, honestly.
You will need wired ribbon, of course, and possibly a hot glue gun for securing things, along with a few other simple bits and pieces. The process often involves making several loops and then gathering them in the center, using a bit of wire or a chenille stem to hold them together. This method allows you to create a really full, dramatic ribbon bow with lots of "fluff." It's actually quite satisfying to see it take shape.
The beauty of wired ribbon is that you can manipulate the loops after they're tied. You can gently bend and pull them to make them stand out, or to give your ribbon bow a more organic, flowing look. This is what gives those big, beautiful Christmas tree bows their wonderful, sculptural quality. You can adjust the size of the bow by changing up the length of ribbon you start with, so there's a lot of flexibility there, you know.
Where Can Your New Ribbon Bow Skills Take You?
Once you get the hang of making a ribbon bow, a whole lot of creative possibilities open up. This simple but very useful type of decoration can be used for so many different things around your home and for special events. For example, they look truly wonderful on hair clips, adding a pretty touch to an everyday hairstyle. They can also really dress up gift bags and presents, making them feel much more thoughtful.
Think about using them for home decor, too. A lovely ribbon bow can be just the thing to add a charming accent to a flower girl basket, or to mark aisle ways at a special event. They're also perfect for giving a little something extra to clothing items. That's right, a well-placed ribbon bow can transform a plain outfit into something with a bit more character. It's a very versatile little craft, basically.
For the holidays, especially, ribbon bows are a must-have. You can make beautiful, casual wired ribbon bows for your Christmas tree, or use them to adorn wreaths for your front door. If finding the perfect gift seems to be an impossible task, at least you can rest assured that your presentation will be top-notch with a handmade ribbon bow. They just add that extra layer of care, in a way, which is really nice.
Choosing the Right Ribbon for Your Ribbon Bow
Picking out the ribbon is half the fun, honestly! There's a huge variety out there, and each kind has its own feel and how it behaves when you tie it. You'll find everything from grosgrain, which is a bit stiff and ribbed, to satiny smooth options, and even luxurious velvet. For a lot of bows, especially those you want to hold a specific shape, wired ribbon is often preferred, as I was saying earlier. It just gives you more control.
The width of your ribbon also makes a big difference in the final look of your ribbon bow. For instance, a 1.5-inch wide wired ribbon is a very common choice for many bow projects because it's wide enough to make a statement but still easy to work with. You can, of course, use different widths, and experimenting with them is part of the creative process. A very thin ribbon bow, for example, might be lovely for a delicate touch on a small gift.
When you're at a craft store, you'll see a whole world of ribbon colors and patterns. Think about what you're decorating when you choose. A festive red or green might be perfect for a Christmas ribbon bow, while something softer might suit a hair accessory. The type of fabric also matters; a satin ribbon, for instance, has a beautiful sheen that can make your bow look very elegant. It's all about finding what feels right for your project, you know.
Caring for and Keeping Your Ribbon Bows Nice
Once you've put in the effort to make a beautiful ribbon bow, you'll want to keep it looking good for as long as possible. The way you store them can make a big difference, especially for those that are meant to be reused, like a large tree topper bow. If your bow is made from wired ribbon, you can usually gently reshape it if it gets a little squished. That's one of the really good things about wired ribbon, actually.
For bows on gifts, of course, they're often enjoyed for a short time and then perhaps kept as a memento or discarded. But for decorative bows you plan to use year after year, like on wreaths or for holiday decor, it's a good idea to store them carefully. You might, for example, place them in a box where they won't get crushed, perhaps with some tissue paper to help maintain their shape. This helps keep the loops from getting flattened, which is pretty important.
If your ribbon bow gets a little dusty, a soft brush or a gentle shake can often take care of it. For more stubborn marks, it depends on the ribbon material. Some ribbons can be spot cleaned with a damp cloth, while others might not react well to water. It's always a good idea to test a small, hidden area first if you're unsure. Taking a little bit of care will ensure your handmade ribbon bows continue to add charm and beauty to whatever they adorn for a good long while, so it's worth the small effort.