Have you ever wondered about those clever stitches that seem to disappear, or perhaps the ones that add a neat, patterned line to your handiwork? Well, as a matter of fact, when we talk about hand sewing, there's a particular technique that often comes up, and it actually goes by the name of the "ladder stitch." It's a rather useful little trick to have up your sleeve, whether you're looking to close up an opening without a trace or add a touch of visual interest to your textile creations, you know?
This particular stitch, or rather, set of stitches, has a couple of different faces, so to speak. One version is all about making things look tidy and almost invisible, perfect for those moments when you want a seam to just melt away. The other, you see, is more about showing off a bit, creating a pretty, structured line that, quite literally, has the appearance of a tiny ladder on your fabric. Both are pretty cool in their own ways, and honestly, knowing about them can really make a difference in how your finished pieces turn out.
So, if you're keen to learn more about how these stitches work, and why you might pick one over the other for your next project, you've come to a good spot. We'll chat about what makes each one special, where they really shine, and give you some ideas on how to get started. It's just a little peek into a very handy part of hand sewing that many folks find quite rewarding to gain skill with, don't you think?
Table of Contents
- What is Ladder Stitch?
- Why Pick Ladder Stitch?
- How to Work the Ladder Stitch?
- What Are Some Tips for a Better Ladder Stitch?
- Ladder Stitch - A Quick Summary
What is Ladder Stitch?
When someone talks about the ladder stitch in hand embroidery, they might actually be talking about one of two quite distinct stitches, you know? It's a bit like having two different tools in your sewing box that share a similar name, but each does its own special job. Both are super useful, but they're for different kinds of sewing tasks, so it's good to know the difference, right?
One of these stitches is a way to make a pretty pattern on the outside of your fabric, giving it a certain look. The other, however, is more about putting pieces of fabric together in a way that you can barely see the connection, which is pretty neat. So, essentially, we're looking at a stitch that's either for show or for hiding, and both are equally clever in their own applications, wouldn't you say?
The Decorative Ladder Stitch - A Visual Treat
So, there's this kind of ladder stitch that's all about making something look nice on the surface of your fabric. It actually creates a band that has a good deal of visual appeal, and it really does look a lot like a small ladder, complete with distinct edges. This one isn't about joining things invisibly; it's about adding a touch of design, perhaps as a border or a feature line on your embroidery piece, you see?
It's often seen in what folks call "surface embroidery," which is just a fancy way of saying you're adding stitches on top of the fabric to create a picture or a pattern. This particular stitch can sometimes involve building on other basic stitches, like a running stitch that's then "laced" in a certain way to give it that recognizable ladder shape. It's a way to bring a bit of structure and a pleasing linear element to your textile art, which is kind of cool, honestly.
Some people might even call it "lattice work" or "lattice stitch" because of its crisscross or rung-like appearance. It's a stitch that takes a little bit of time to create, especially if you're aiming for a very neat and consistent look, but the end result can be quite striking. You're basically building up a textured design, step by step, that really catches the eye, in a way.
The Blind Ladder Stitch - Your Secret Seam
Then there's the other kind, which is called the "blind ladder stitch." This one is truly a magician's trick in the world of hand sewing, because its main job is to close up openings or join pieces of fabric together in a way that the stitches just seem to disappear. It's like they're there, doing all the hard work, but you can barely tell, which is pretty amazing, don't you think?
You'll often use this particular stitch when you need to close up a "turning gap" – that's the little opening you leave when you're making something like a soft toy or a cushion that needs to be turned right side out after sewing. It helps you sew that gap closed by hand, making the seam almost invisible from the outside. It's a very neat finish, and that's why it's so popular, so.
This blind ladder stitch is also really good for joining different parts of an embroidered item or a fabric project. For example, if you're making something structured, like a little scissor case, you might use it to sew the base round onto the side piece. It helps the pieces come together cleanly, and importantly, it helps the sides stand up from the base more readily than some other stitches might, like a simple whipstitch, you know?
It's also a very helpful technique to know for finishing off various embroidered items, giving them a professional and tidy look. People use it for things like "mitering corners" – that's when you join two edges at an angle, usually 45 degrees, to make a neat corner. The blind ladder stitch helps these corners look really sharp and seamless, which is a great touch for any project, actually.
Why Pick Ladder Stitch?
So, with these two distinct types of ladder stitch, you might be wondering why you'd choose one over another, or even why you'd pick a ladder stitch at all when there are so many other stitches out there. Well, it really comes down to the kind of job you're trying to do and the kind of look you want to achieve, you see?
Each version of the ladder stitch brings its own set of advantages to the table, making it the perfect choice for specific situations. It's not just about knowing how to make the stitch, but also about knowing when it's the very best option for your project. This is pretty key to getting results you're happy with, in a way.
When to Use the Blind Ladder Stitch
The blind ladder stitch is your go-to friend when invisibility is the name of the game, so it is. If you've got an opening that needs to be sewn shut on something that's been turned right side out, like the bottom of a pillow or the side of a stuffed animal, this stitch is practically magic. It helps you make that closing seam practically disappear, which gives your project a really clean and finished look, you know?
It's also particularly good for joining pieces where you want a strong, yet unseen, connection. For example, when putting together a fabric box or a little pouch where the sides need to stand up nice and straight from the base, the blind ladder stitch does a fantastic job. It provides a firm connection that helps maintain the structure of your piece, which is really important for certain designs, apparently.
Compared to some other joining stitches, like a whipstitch, the blind ladder stitch often provides a more stable and less noticeable seam when you need pieces to stand upright. This is because of how the stitches interlock, pulling the two fabric edges together tightly and evenly, without creating a bulky line. It's a very neat solution for those tricky spots, and it's quite satisfying to see the seam just vanish, actually.
Beyond closing gaps and joining structural pieces, it's also a super useful stitch for things like mitering corners on fabric borders or binding. It helps you get those crisp, clean angles that really make a piece look polished. So, if you're aiming for a very professional and tidy finish on your hand-sewn items, this stitch is definitely one to have in your repertoire, you know?
When the Decorative Ladder Stitch Shines
On the flip side, the decorative ladder stitch is chosen for its visual appeal, plain and simple. When you want to add a textured line, a border, or a specific design element to your embroidery, this is the stitch to consider. It brings a unique, patterned look that can really add interest to a flat surface, you see?
It's perfect for projects where you're not trying to hide anything, but rather, you're trying to show off the beauty of the stitching itself. Think about using it to outline a shape, to create a textured band across a piece of fabric, or even to add a little bit of dimension to a picture you're creating with thread. It has a very distinct appearance that can really make parts of your design stand out, which is pretty cool.
While it might take a bit more time to create than some quick, functional stitches, the effect it produces is quite rewarding. The deliberate, structured nature of the "rungs" and "edges" of this stitch gives it a crafted feel that's hard to replicate with other techniques. It's a way to add a touch of traditional embroidery flair to your work, and it often becomes a focal point, you know?
So, if your goal is to create something visually engaging, something that draws the eye and adds a layer of texture and pattern, then the decorative ladder stitch is absolutely worth the effort. It's a way to make your hand sewing not just functional, but also a piece of art in itself, you know?
How to Work the Ladder Stitch?
Now that we've chatted about what these ladder stitches are and why you might want to use them, let's talk a little bit about how you actually go about making them. While I can't show you pictures right here, I can give you a pretty good idea of the steps involved, especially for the blind ladder stitch, which is super practical, you see?
Learning how to perform these stitches is pretty straightforward once you get the hang of it, and a little bit of practice goes a long way. It's all about getting your needle in the right spots and pulling your thread just so, which is something you pick up quickly with a few tries, honestly.
Getting Started with the Blind Ladder Stitch
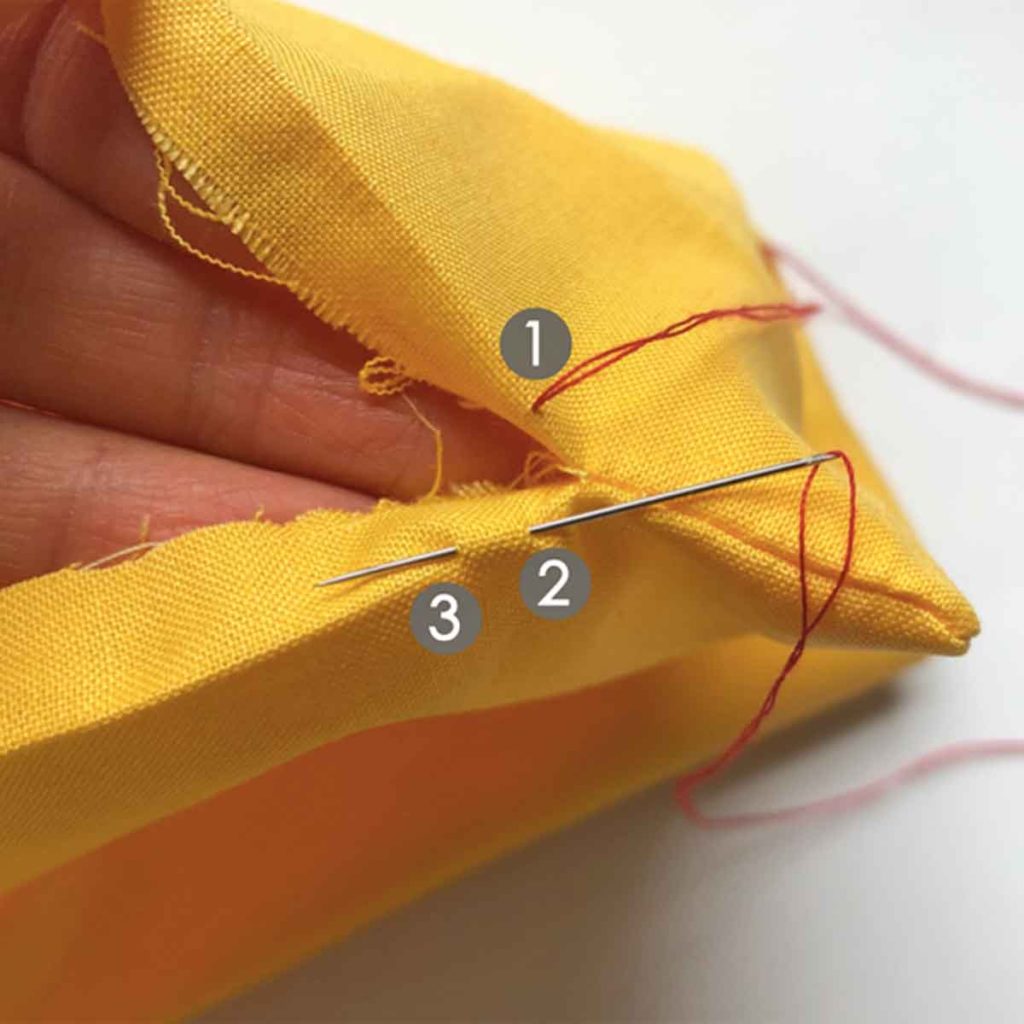
When you're ready to sew a turning gap closed with the blind ladder stitch, you'll want to use your sewing thread, of course. You'll typically start by bringing your needle up from the inside of the fabric, right near the edge of the opening. This helps hide the knot at the start, which is a neat little trick, you know?
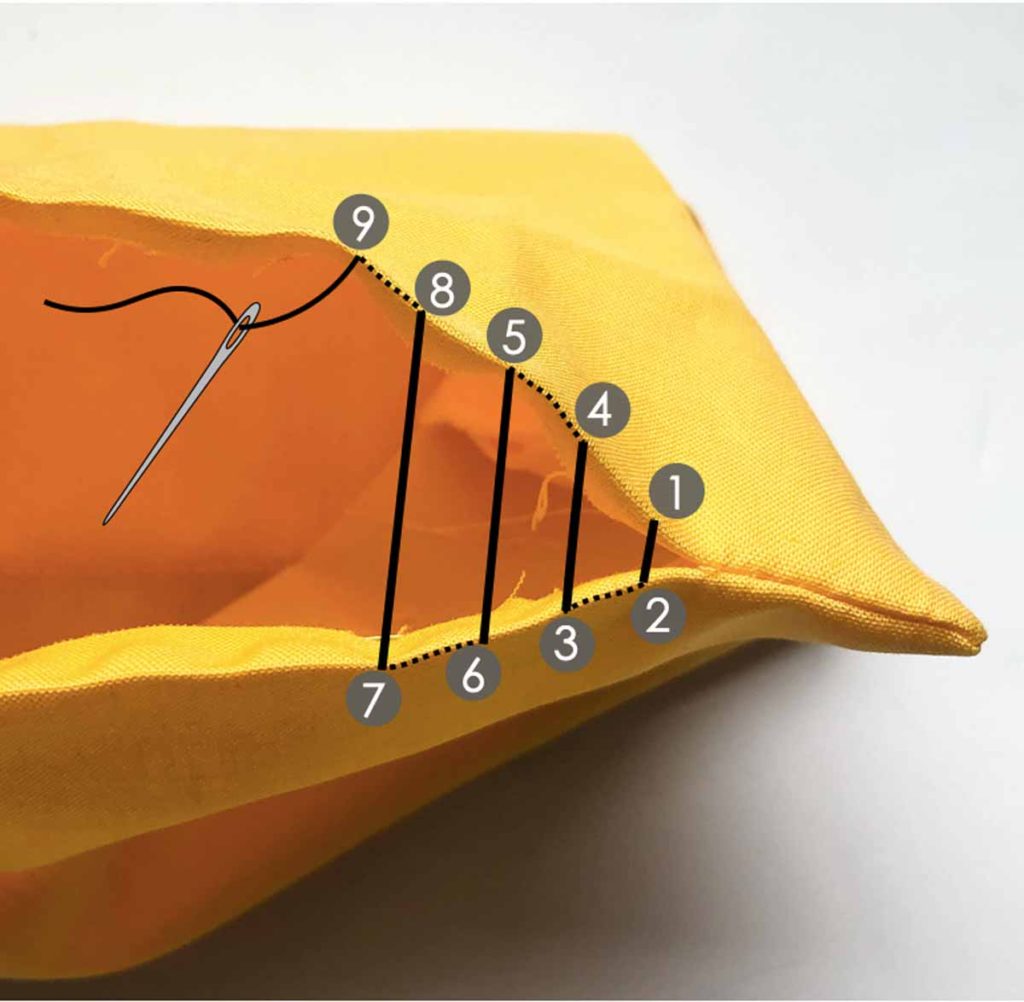
Then, you'll take a small stitch on one side of the opening, going into the fold of the fabric and coming out a short distance along the edge, staying hidden within the fold. After that, you'll bring your needle directly across to the opposite side of the opening and take another small stitch, again staying within the fold of that fabric edge. You're basically creating little horizontal "rungs" of thread that go between the two folded edges, which is kind of how it gets its name, you see?
You'll keep repeating this process – a small stitch on one side, then directly across to the other side for another small stitch – moving along the opening. As you pull your thread gently, these little "rungs" of thread will pull the two folded edges of fabric together, and they'll sort of roll inwards, making the seam almost disappear. It's pretty satisfying to watch it happen, honestly.
When you get to the end of your opening, you'll want to secure your thread. You do this by making a small knot discreetly, perhaps by taking a tiny stitch and looping the thread through it a couple of times. Then, you can take your needle out on the edge close by, pulling the thread through the fabric for a short distance before snipping it off. This helps hide the tail of your thread really well, which is a good finishing touch, you know?
A Glimpse at the Decorative Ladder Stitch Steps
For the decorative ladder stitch, the process is a bit different since you're working on the surface. While the original text mentions things like "laced running stitch ladder stitch lattice" and "over the front of ladder and aim thread beneath ladder on the left of the upright previous chain stitch then over top of chain," this suggests it might involve a base stitch, like a chain stitch or running stitch, that you then "lace" or "weave" over. It's a very textural stitch, so.
You might start by laying down two parallel lines of a basic stitch, perhaps a running stitch or even a backstitch, to form the "sides" of your ladder. Then, you would use a second thread, or even the same thread, to create the "rungs" by weaving it back and forth between these two lines. This weaving action is what gives it that distinctive ladder appearance, you see?
The description of "aim thread beneath ladder on the left of the upright previous chain stitch then over top of chain,Take down to next ladder and repeat" implies a method of working the thread around existing stitches to build up the ladder shape. It's a process of layering and looping that creates a raised, patterned effect on the fabric, which is quite different from the hidden nature of the blind ladder stitch, apparently.
This stitch, because it builds up a visual element, typically takes a bit more time to create than a simple, quick stitch. It's about precision and consistency to make sure your "rungs" are evenly spaced and your "sides" are straight. But the effort is well worth it for the beautiful, textural result it provides, which is pretty neat, honestly.
What Are Some Tips for a Better Ladder Stitch?
Getting a great result with either type of ladder stitch often comes down to a few simple things, you know? It's not about being a master embroiderer right away, but about paying attention to some small details that can make a big difference in how your stitches look and perform. These little bits of advice can really help you get a good handle on things, so they can.
One good tip, especially for the blind ladder stitch, is to keep your stitches small and even. The tinier and more consistent your stitches are, the more invisible your seam will be. It's like building a wall with tiny, perfectly placed bricks – it just looks better, and it's stronger, too it's almost. This takes a bit of practice, but it's worth the effort for a truly hidden seam, you see?
For the blind ladder stitch, if you're joining pieces with a bit of stiffness, like a paper form inside hexies for quilting, that internal structure can actually be a pretty good guide for your needle. It gives you something firm to push against, helping you keep your stitches straight and even, which is a neat little trick. The tip of your needle can follow that edge quite nicely, in a way.
Another thing to keep in mind, particularly when you're joining fabric pieces that need to stand up from a base, is that the blind ladder stitch is often a better choice than a simple whipstitch. The way the blind ladder stitch pulls the fabric together creates a firmer, more stable join, which helps those sides maintain their upright position. It's a really practical consideration for structural projects, you know?
And for both types of ladder stitch, using a thread that matches your fabric as closely as possible is usually a good idea, especially for the blind stitch where you want it to disappear. For the decorative stitch, you might pick a contrasting color for effect, but even then, choosing a thread that complements your fabric will make your work look more polished. It's all about those small choices, apparently.
Finally, remember that practice makes things easier. The more you work with these stitches, the more natural they'll feel, and the better your results will be. Don't be afraid to try them out on some scrap fabric first, just to get a feel for the movement and tension. It's just a matter of getting comfortable with the motion, and then you'll be stitching like